About Me

My photo
Well, here goes.....I am somewhat new to this, so I will attempt to make it worth your time to read and enjoy some of the recipes that I love to share. I created this blog as a result of me following a cooking blog and enjoying it so much that I thought I would give it a try on my own. (Yes, I still follow the other blog and will be sharing that one with your as soon as I figure out how). I love to cook and try new recipes. I am certainly not the best cook, and still have a lot to learn, but I love to try new dishes and have my family try them out. I can usually tell by how much is left in the pan as to how they liked it! Pan clean...it's a keeper!

Thursday, June 18, 2009

Southern Fried Gator meat

This post is for all of y'all that like gator meat....or have been wanting to know how to fix it.
If you have never tried it...you really should! Gator is a white meat that can be purchased usually in 2.5 lb. packages. It does not taste like fish or anything else except gator. It cooks very quickly, so when you fry it, you only fry it for about 3 minutes or so.
For this recipe you will need:
1 package of gator meat, cut in small pieces (it usually comes packaged that way),
about 1 cup milk or buttermilk, salt & pepper, flour, oil for frying and a cast iron skillet.
First, put the meat in a small container and add the milk or buttermilk. It does not have to be completely submerged. Add salt & pepper and let sit for about 30 minutes to an hour or so.


Heat oil in cast iron skillet to about 350 degrees. In a large zip lock bag add some flour (about 1 cup or so) add a little salt & pepper, garlic powder or your other favorite seasoning. Add gator meat to zip lock bag, shaking off excess milk, and shake the bag to cover meat with flour. Fry for about 3 minutes or so, turning once. Drain on paper towel and serve immediately. I usually put paper towels in the bottom of a paper grocery bag and fold it over after adding a batch. It keeps your stuff warm, and the bag absorbs the excess grease.


Chicken & yellow rice

I guess by now y'all think the only thing we eat at our house is chicken...well we do eat alot of it because it is inexpensive and easy to fix in alot of different ways. (Do not ask me why this thing is underlining every single sentence...I tried my best to figure out how to shut the darn thing off...but no success.) Holy moly...it heard me!!! It's gone!!
Now...back to the recipe...
You will need:
1 whole chicken,
3-4 chicken bullion cubes,
1 pkg. of your favorite yellow rice,
seasonings...salt & pepper or your favorite seasoning such as lemon pepper, garlic powder, etc.,
water

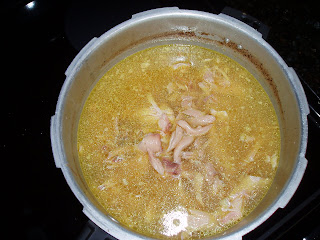
First, wash chicken and place in large stockpot or pressure cooker. Add enough water to just cover the chicken. Add bullion cubes, salt, pepper and seasonings. If using a pressure cooker, cook for about 30-35 minutes at 10 lbs. pressure. If using a regular stockpot, cook at slow boil for about 45 min. to 1 hour depending on the size of chicken. When chicken fall apart easily...it is done. Remove from heat and let cool. Save the chicken broth in the pot. When cooled off, debone chicken and discard bones and skin.


Put chicken pieces back in the pot that you cooked it in. Depending on the size bag of rice...be sure that you have enough broth that the bag calls for. You may have to add a little water.


I use this brand and family size bag. (Gotta love leftovers the next day!)


Bring the broth and chicken back up to a boil, add rice and boil for 1 minute, stirring constantly. Reduce heat to low or simmer, cover with tight fitting lid and simmer for about 25 minutes. DO NOT TAKE THE LID OFF!! YOU MUST NEVER TAKE THE LID OFF OF RICE NO MATTER HOW BAD YOU WANT TO PEEK!!


This is what it will look like when you take the lid off...(if you dont peek!!!) Serve with your favorite vegetable or just eat it by itself...
And there you have your one pot dish!! Enjoy!

Thursday, June 4, 2009

Homemade Chicken Pot Pie


  • 1 whole chicken, cooked ahead and de-boned (you can substitute with 2 large cans of white meat chicken if you are in a hurry)
  • 1 onion, chopped
  • 1 cup of fresh carrots or 1 can of sliced carrots (drain the liquid off)
  • 1 stick of butter or 1/2 cup of margarine
  • 1/2 cup all purpose flour
  • 2 cups chicken broth
  • 1 cup half & half
  • 2-3 chicken boulion cubes
  • 1 can green peas or 1 can Veg-all (drained)
  • 1 tube of refrigerator bisquits (I use Grands Butter-Tastin) if you have a large crowd, use 1 tube of 8 and a small one of 5.
In large oven safe skillet, add butter, onions & carrots; saute for about 10 minutes over medium heat. Add flour, continue to stir until flour coats carrots & onions (it will look very gummy...that is normal). Add chicken broth and boulion cubes, stirring to dissolve flour, then add half & half. Continue to cook over medium heat, stirring often until mixture bubbles slightly. Reduce heat to low, add cooked chicken and vegetables. Simmer for about 10 minutes or so.
While mixture is simmering, preheat oven to temperature according to package directions on bisquits. When oven is ready, place uncooked bisquits on top of mixture and cook according to directions (usually 375 degrees for about 15 minutes)